Cloud Search Service Application
One of the great enhancements in SharePoint 2016 and in the SharePoint 2013 August 2015 CU, is the Hybrid Search using Cloud Search Service Application (CSSA). The new CSSA will allow organizations to take advantage of the new hybrid capabilities, in order to create a unique search experience with one index, with crawled content from Office 365 and On-Premises data. Having one Index is huge step to better enhance the end user experience and making it easier to find results from different sources.
In this article, I will be showing step-by-step how to set up your CSSA . It is a pretty simple process if you follow the steps in order.
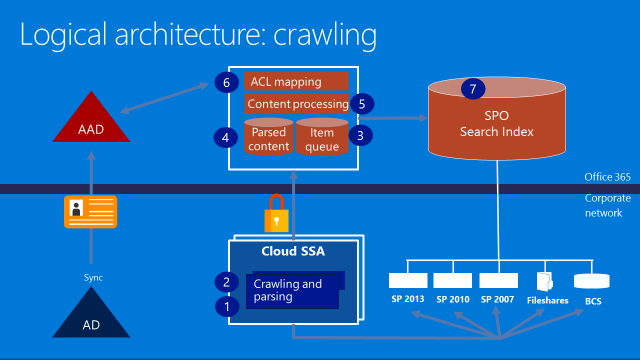
First of all, let's review how the CSSA indexing and crawling works. Picture 1 shows that crawling is initiated from on-premises, but the index is stored on your Office 365 tenant.

Picture 1
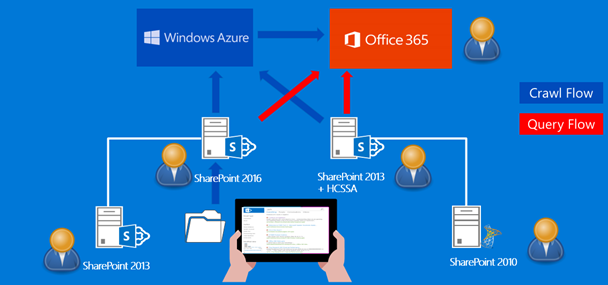
Picture 2 describes the flow of the search queries and the possibilities to send a query from the cloud or on-premises.

Picture 2
Mandatory Requirements
The following are mandatory requirements to get your CSSA working:
1. SP2013 with August 2015 CU or SP 2016
2. O365 Subscription
3. Azure Subscription
4. Synchronize users and groups from on-premises to Office365 Azure Active Directory (DirSync, AADSync, or AADConnect)
5. Create cloud Search service application
6. Install onboarding pre-requisites
7. Execute onboarding script
Azure AD (AAD) requirements
- Need Azure Subscription (or trial subscription) or Office 365 paid license
- Verified domain; xxx.onmicrosoft.com is not enough
-
On-premises:
- AD Server must be 2003 or later
- If you want to use password writeback, then you must have Windows Server 2008 with latest SP and KB2386717; otherwise use Windows Server 2008 R2+
- Azure AD Connect can be installed on AD or any server part of the domain
- If you plan password synchronization is required, then server must be 2008 R2 SP1 or later
- .NET 4.5.1 or later
- PowerShell 3.0
- If you are using ADFS, then SSL is needed x.509 (self-signed is OK in test lab
Step 1 – Synchronize AAD
First you must synchronize your On-Premises AD with AAD. Follow these steps to install and configure your AAD Connect: https://azure.microsoft.com/en-us/documentation/articles/active-directory-aadconnect/
Step 2 – Create your CSSA
You can either use Central Admin or PowerShell. If you are using Central Admin, then you will see a new checkbox for the cloud search option. You must check it to make sure you are creating a CSSA and not a regular SSA. If you are like me, who prefers to use PowerShell, then you will make a small change to your existing script. If you don’t have one, you can download any SSA script, but make sure you add the following variables to the New-SPEnterpriseSearchServiceApplication:
New-SPEnterpriseSearchServiceApplication -Name $SearchServiceAppName -ApplicationPool $appPool -DatabaseServer $DatabaseServerName -CloudIndex $true
Then you need to set your SSA Property to true by executing this command: $Searchapp.SetProperty(“IsHybrid”,1), before you set your Search Topology.
Your Powershell Script should like similar to this:
SSADB = "SharePoint_Demo_Search"
$SSAName = "Search Service Application SPS Baltimore"
$SVCAcct = "<search Service account>"
$SSI = get-spenterprisesearchserviceinstance -local
#1. Start the search services for SSI
Start-SPEnterpriseSearchServiceInstance -Identity $SSI
#2. Create the Application Pool
$AppPool = new-SPServiceApplicationPool -name $SSAName"-AppPool" -account $SVCAcct
#3. Create the search application and set it to a variable
$SearchApp = New-SPEnterpriseSearchServiceApplication -Name $SSAName -applicationpool $AppPool -databaseserver SQL2012 -databasename $SSADB –CloudIndex $true
#4. Create search service application proxy
$SSAProxy = new-SPEnterpriseSearchServiceApplicationProxy -name $SSAName" Application Proxy" -Uri $SearchApp.Uri.AbsoluteURI
#5. Provision Search Admin Component
Set-SPEnterpriseSearchAdministrationComponent -searchapplication $SearchApp -searchserviceinstance $SSI
#6. Create the topology
$Topology = New-SPEnterpriseSearchTopology -SearchApplication $SearchApp
#7. Assign server(s) to the topology
$hostApp1 = Get-SPEnterpriseSearchServiceInstance -Identity "SPWFE“
$Searchapp.SetProperty(“IsHybrid”,1)
New-SPEnterpriseSearchAdminComponent -SearchTopology $Topology -SearchServiceInstance $hostApp1
New-SPEnterpriseSearchCrawlComponent -SearchTopology $Topology -SearchServiceInstance $hostApp1
New-SPEnterpriseSearchContentProcessingComponent -SearchTopology $Topology -SearchServiceInstance $hostApp1
New-SPEnterpriseSearchAnalyticsProcessingComponent -SearchTopology $Topology -SearchServiceInstance $hostApp1
New-SPEnterpriseSearchQueryProcessingComponent -SearchTopology $Topology -SearchServiceInstance $hostApp1
New-SPEnterpriseSearchIndexComponent -SearchTopology $Topology -SearchServiceInstance $hostApp1 –IndexPartition 0
#8. Create the topology
$Topology | Set-SPEnterpriseSearchTopology
Step 3 – Validate your CSSA
Run the following PowerShell script to validate that your SSA is cloud based.
Add-PSSnapin Microsoft.SharePoint.Powershell
$ssa = Get-SPEnterpriseSearchServiceApplication
Get-SPEnterpriseSearchTopology -Active -SearchApplication $ssa
Get-SPEnterpriseSearchStatus -SearchApplication $ssa -Text |ft Name, state,Partition,Host -AutoSize
$ssa.CloudIndex
This should return True.
Step 4 – Install On-Boarding Pre-requisites
You must install the following, in order, before you proceed with the On-Boarding script:
1. Microsoft Online Services Sign-In Assistant: https://www.microsoft.com/en-ca/download/details.aspx?id=28177
2. Reboot the Server
3. Microsoft Azure AD PowerShell: http://go.microsoft.com/fwlink/p/?linkid=236297
If you do not install the above, then the next step will not work as it is needed to establish the trust between your Farm/CSSA and your Online tenant.
Step 5- Run On-Boarding Script
The On-Boarding script is a PowerShell, provided by Microsoft, that you must run as your last step to complete your CSSA configuration. You can download the On-Boarding script from GitHub. When you run this script, you will be asked to enter your O365 tenant credentials. The user must be a tenant admin account to be able to execute the script.
Crawl your content
Once you have completed, you can start adding you content sources to your CSSA. Your content sources can be any SharePoint portal (2010, 2013, 2016, etc.), any folders, exchange, etc. Basically, it is the same content sources you used to crawl with a regular SSA.
When you are completed, then you can navigate to your SharePoint Online, search for a keyword and results should appear from Online and On-Premises.
 Sunday, October 09, 2016
By : Mike Maadarani
 0 comment
Archives
- December 2023
- November 2023
- October 2023
- September 2023
- August 2023
- January 2023
- November 2022
- October 2022
- May 2022
- March 2022
- January 2022
- December 2021
- November 2021
- October 2021
- March 2021
- October 2020
- September 2020
- July 2020
- March 2020
- February 2020
- January 2020
- December 2019
- November 2019
- October 2019
- September 2019
- June 2019
- May 2019
- March 2019
- February 2019
- January 2019
- December 2018
- November 2018
- October 2018
- September 2018
- August 2018
- July 2018
- June 2018
- May 2018
- April 2018
- March 2018
- February 2018
- January 2018
- December 2017
- November 2017
- October 2017
- August 2017
- July 2017
- June 2017
- May 2017
- March 2017
- February 2017
- January 2017
- October 2016
- September 2016
- August 2016
- July 2016
- June 2016
- May 2016
- March 2016
- February 2016
- January 2016
- September 2015
- August 2015
- July 2015
- June 2015
- April 2015
- February 2015
- January 2015
- November 2014
- October 2014
- September 2014
- November 2013
- July 2013
- February 2013